

Spawn's youngest cousin's 3rd birthday party is today and we NEVER buy birthday-themed wrapping paper. Being homeschoolers, we don't get 30 party invites every year. (Thank goodness!) We attend just a few parties for cousins and best friends and that suits us fine! =D So I always keep some brown and white craft paper on hand so we can make our own paper or I buy deeply discounted gift wrap, turn it inside-out, and stamp or draw on the back side to make DIY birthday wrapping paper. ;) Kids parties can be really spendy if you're not careful! $20 for a gift, $6 - 8, for gift wrap, $3 for a ribbon or a bow, and $5 for a card adds up fast! That's at least $35 per party!
This time, we opted to re-gift a gift that Spawn received for Christmas this past year from a well-meaning family member who frequently forgets that he doesn't care for coloring books. Thankfully, being my mother, she doesn't take offense when we make gifts of these items for other family members. ;) She also works for Crayola and gets a hefty employee discount, so it's not particularly pinching to her wallet or ours to give it to someone who will ultimately enjoy it.
Now, all things considered, I wouldn't use the plain white craft paper for a child any older than age 3 because it is a bit see-through, but my 3 year old nephew isn't likely to notice or care at his age. ;)
My apologies for the dark photos. Indoor crafts on cloudy days in a yellow family room that has only one window make for some interesting photography challenges. :P
My apologies for the dark photos. Indoor crafts on cloudy days in a yellow family room that has only one window make for some interesting photography challenges. :P
Cookie Cutter Hand-stamped, Personalized Wrapping Paper
What You'll Need:
a gift to wrap
scotch tape
plain paper of some kind, large enough to cover the gift
acrylic paint
glitter markers
paper plates
plastic cookie cutters
paper towels
smocks or old clothes to wear
endless wells of patience ;D
Where to Begin:
You may want to lay out some newspapers or an old tablecloth to cover your workspace. We did this on Spawn's school table in our family room and the acrylics are water-soluble, so I wasn't worried about the surface of the table. The acrylic wiped right off.

We began yesterday afternoon by wrapping both gifts BEFORE stamping the paper. It's so much easier and less wasteful to stamp the front of a pre-wrapped gift than to stamp the paper, find somewhere to lay it out to dry flat, and keep kids and cats from smearing it or dragging it across floors and furniture. ;) My craft paper came from Michael's and had these weird ridges like corduroy across it, so I turned it inside-out to get the flattest surface possible. It worked great! We had two gifts to wrap: a Color Wonder Sound Studio and a Toy Story Expansion Pack for the Sound Studio. Two great gifts, one low (nonexistent) price! =D

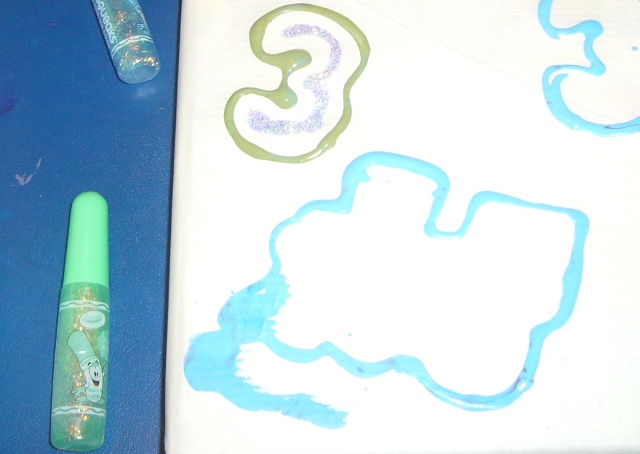
Let me begin by saying - we did not have the exact colors Spawn wanted to use. I wanted to use the basic 3 primary colors we had plenty of because it's a gift for a toddler, but Spawn wanted to use black and white. Then, he wanted to use secondary colors. Then, he wanted to use cool colors. Then...you get the idea. ;) We finally settled on mixing our own sky blue, leaf green, and plum colors. Take my advice, don't skimp on the paint or you won't have a deep enough well to dip the cookie cutters into!

For the design, we chose a "3" cookie cutter for obvious reasons ;), a star because it's a party, a train because my nephew and Spawn love to play with Thomas trains together, and a plane because my nephew loves planes and things that GO!
You'll notice the cookie cutters are sitting on a little strip of paper towel to be used for blotting excess paint between color changes. I underestimated the amount of wiping I'd need to do to keep from mixing the colors up too much. So take my advice and keep a few extra paper towels on hand. ;)

Spawn was chomping at the bit, so I showed him how and what to do and set him loose! He worked so carefully, so diligently that the only really bad smudge...was caused by my own big fat arm getting in the way! Ugh. I was upset with myself, but, let me tell you, it was nothing compared to Spawn's "disappointed in you" face. ::sigh:: Clumsy, fat-fingered mothers are the bane of your existence when you're 8 and a tidy little neatnick. :P

After Spawn had thoroughly stamped every available area on the front surface of both gifts, we decided it need a little blingy embellishment. Spawn was NOT willing under any circumstances to risk smudging his paint or getting it on himself, so I lent a steady hand for this part and added the bling where and how Spawn instructed me. These are the times that test my resolve to be a good mother. ;) I deserve sainthood, I'm telling you! I did further smudge the paper, but Spawn doesn't know it and I didn't own up to it, so there's a tenuous peace for the time being. ;) I think these last few photos say it all. ;)


If you enjoyed this post, please share it with like-minded friends on facebook or pin it on Pinterest to save this craft idea for your next kids party and help us spread the word about Spawn’s Supermegatotally Thrilladelic Not Bummer Summer!
Chrissi, Cyber School Mom
If you're interested in reading the preceding summer project posts that we've already completed, you can always search the tag cloud in the lower right sidebar for "Spawn’s Supermegatotally Thrilladelic Not Bummer Summer," or click here to go straight to the search results: Spawn's Supermegatotally Thrilladelic Not Bummer Summer


1 comment:
Very cute!!! I love this idea! I've used brown paper and painted/colored on it before for gift wrap, but never thought of using cookie cutters! Love it!
Post a Comment